At 10:47 pm, Otieno’s phone lit up on the counter.
“Nimetuma.” I’ve sent it. Then a screenshot of an M-Pesa message: KSh 4,500 for the white high-tops, size 43, delivery to Rongai in the morning.
He was half-way through taping the box shut when he stopped and opened his M-Pesa statement. Nothing. He refreshed. Still nothing. The screenshot was fake: a neat edit of somebody else’s message. It was the second one that month.
Otieno sells sneakers from a small shop in Nairobi’s CBD and, more and more, to customers he never meets: on Instagram, on TikTok and on his website. Every one of those online orders ended the same way. Customer pays to his till, sends a screenshot, he checks his phone, he replies, he packs. At midnight. On weekends. In the middle of serving someone in the shop.
The next morning he asked the question that brings a lot of Kenyan business owners to this page: “Can my website just take M-Pesa by itself?”
It can. Here is exactly how, what you need, how long it takes and what it costs, in plain language.
The short answer
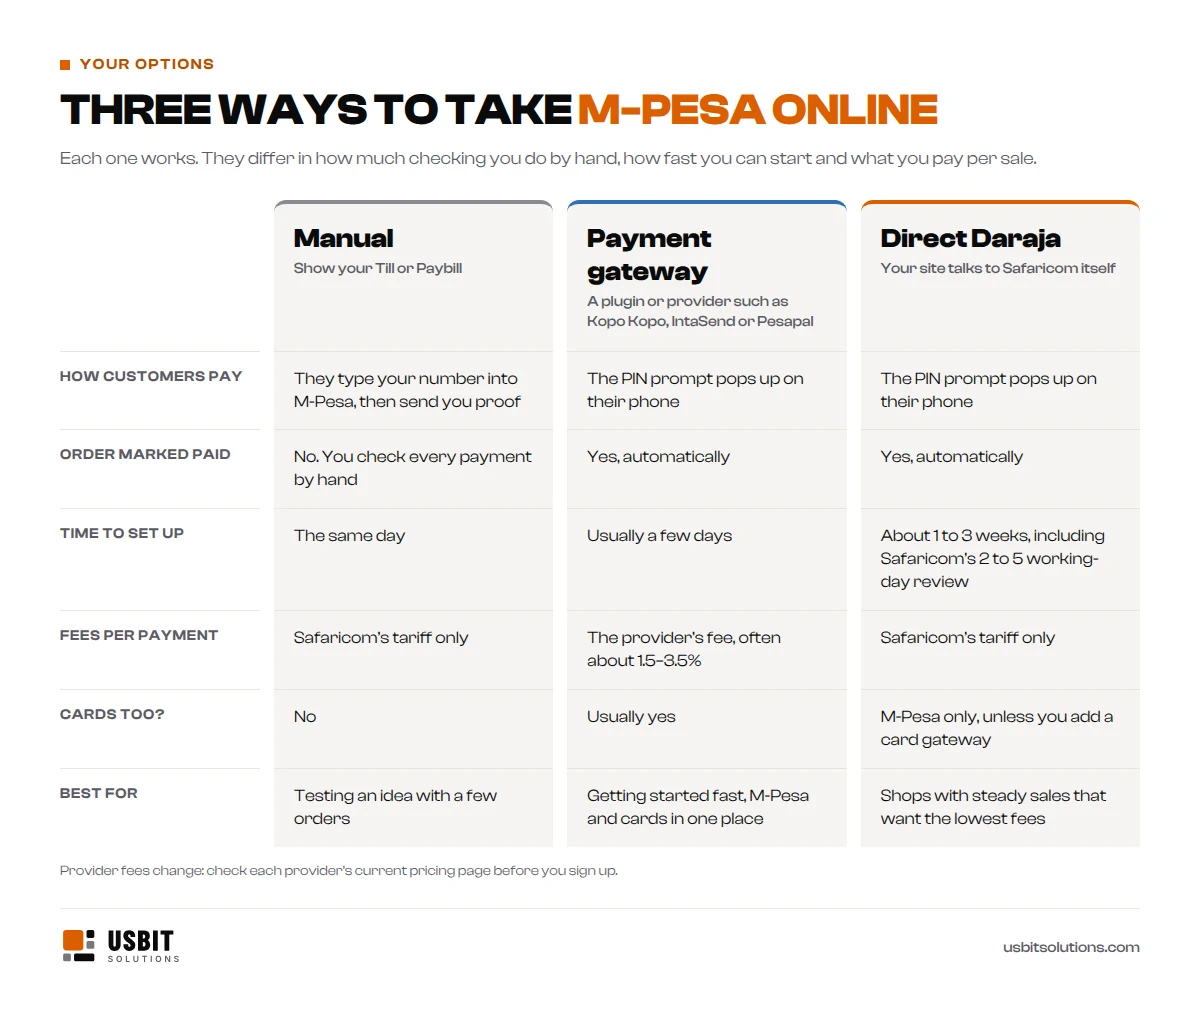
Your website can take M-Pesa in three ways:
- Manually: show your Till or Paybill number and confirm each payment by hand. Free, but slow and easy to fake.
- Through a payment gateway such as Kopo Kopo, IntaSend or Pesapal. Quick to set up, M-Pesa and cards together, plus the provider’s fee on each sale.
- Directly through Safaricom’s Daraja API using STK Push (Lipa na M-Pesa Online). The customer gets a PIN prompt on their phone and your website marks the order paid automatically. You pay only Safaricom’s normal charges.
For a direct connection you need a registered business, an active Till or Paybill, a website on HTTPS and about one to three weeks, including Safaricom’s review.
What is Lipa na M-Pesa Online (STK Push)?
You have almost certainly used it. You click Pay with M-Pesa on a website, type your phone number, and a box pops up on your phone asking for your M-Pesa PIN. That pop-up is called STK Push, and Safaricom calls the service Lipa na M-Pesa Online.
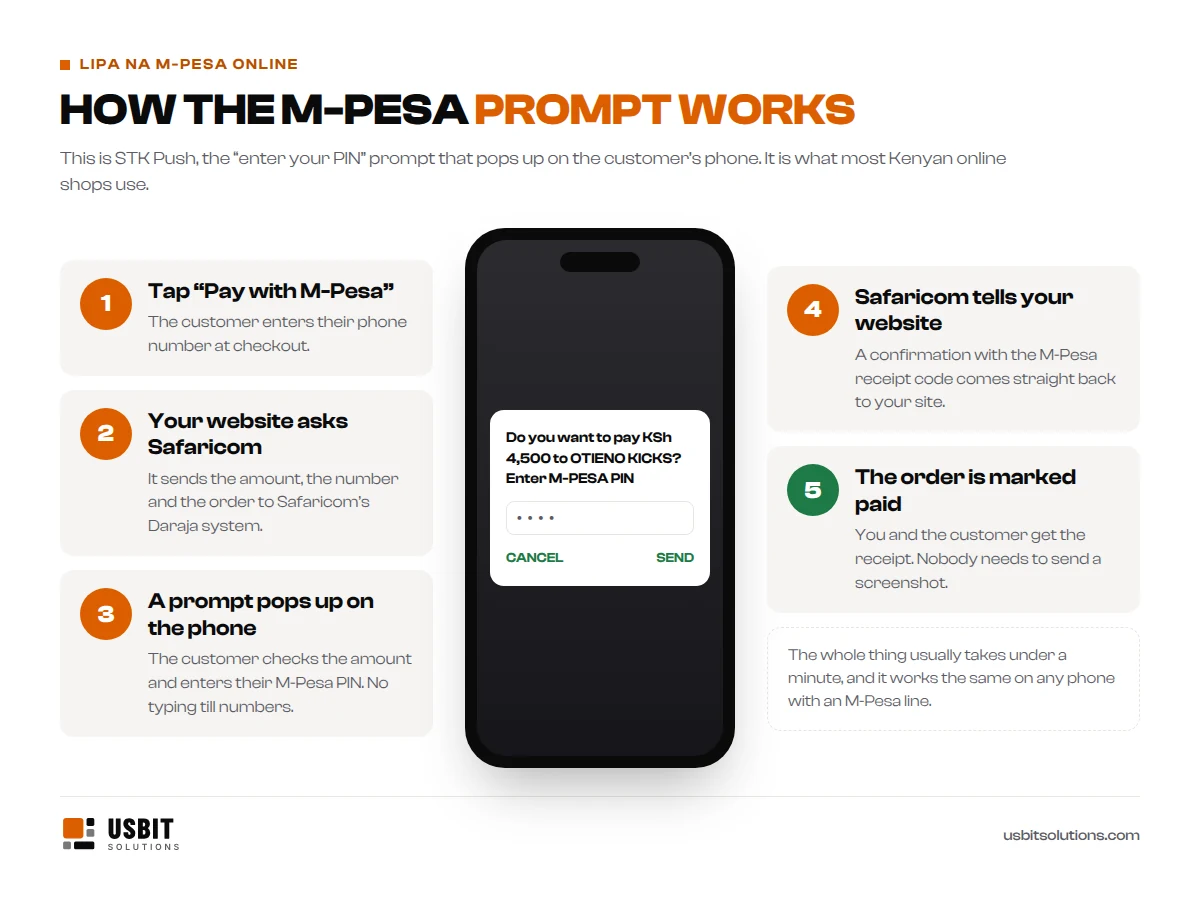
For a business, the magic is in step four. Safaricom sends the confirmation straight to your website, with the M-Pesa receipt code. Nobody types a till number wrongly, nobody forwards a screenshot, and your website knows which order was paid, even at 3 am.
This was the part Otieno cared about most. A fake screenshot cannot fool a website that only believes Safaricom.
Three ways to take M-Pesa on your website
Otieno’s first thought was to download “an M-Pesa plugin” and be done by lunch. It turns out there are three roads, and they suit different businesses.
1. Manual: show your Till or Paybill number
This is where most businesses start, and where Otieno was. It costs nothing to set up and works on day one. But you confirm every payment yourself, customers can mistype your number, and fake confirmation messages are a real problem. Fine for a handful of orders a week. Painful at fifty.
2. A payment gateway
Providers such as Kopo Kopo, IntaSend and Pesapal give you a ready-made checkout and a plugin for WordPress (WooCommerce), Shopify or a custom site. They handle the connection to Safaricom, often add card payments, and you can usually start within days. The trade-off is the provider’s fee on each payment, typically somewhere around 1.5–3.5% depending on the provider and the payment method. Check each provider’s current pricing page, because fees change.
3. Direct integration with Safaricom’s Daraja API
Here your website talks to Safaricom itself, through Daraja, Safaricom’s developer platform. There is no middleman fee, only Safaricom’s normal charges. It takes longer to set up and needs a developer, but for a shop with steady sales the savings add up month after month.
Otieno did the maths on one pair of KSh 4,500 sneakers. At a 1.5% gateway fee, that sale would cost him about KSh 68. Through his own till, Safaricom’s charge on the same sale is about KSh 25. On two hundred pairs a month, that difference is real money.
Till or Paybill: which one does your website need?
Both work with STK Push. The difference is in how customers pay you when they are not using your website, and in who pays the fee.
| Till number (Buy Goods) | Paybill number | |
|---|---|---|
| How customers pay manually | Buy Goods, then your till number | Paybill, your business number, then an account number |
| Account or order number | None | Yes, so each payment can carry an order or invoice reference |
| Fees for the customer | None | Depends on the Paybill’s tariff: the customer or the business pays a small fee |
| Best for | Shops, restaurants, salons and online stores selling to the public | Invoices, school fees, rent, subscriptions and accounts |
With STK Push, your website matches each payment to its order automatically, so a Till is usually the simplest choice for an online shop, and it is free for your customers. Choose a Paybill if customers also pay you manually and you need each payment to carry an invoice or account number. You can apply for either on Safaricom’s M-Pesa for Business portal or in a Safaricom shop.
What you need before you start
This is the part nobody tells you, and where most delays happen. Safaricom only gives live Daraja access to registered businesses, and every document has to match.
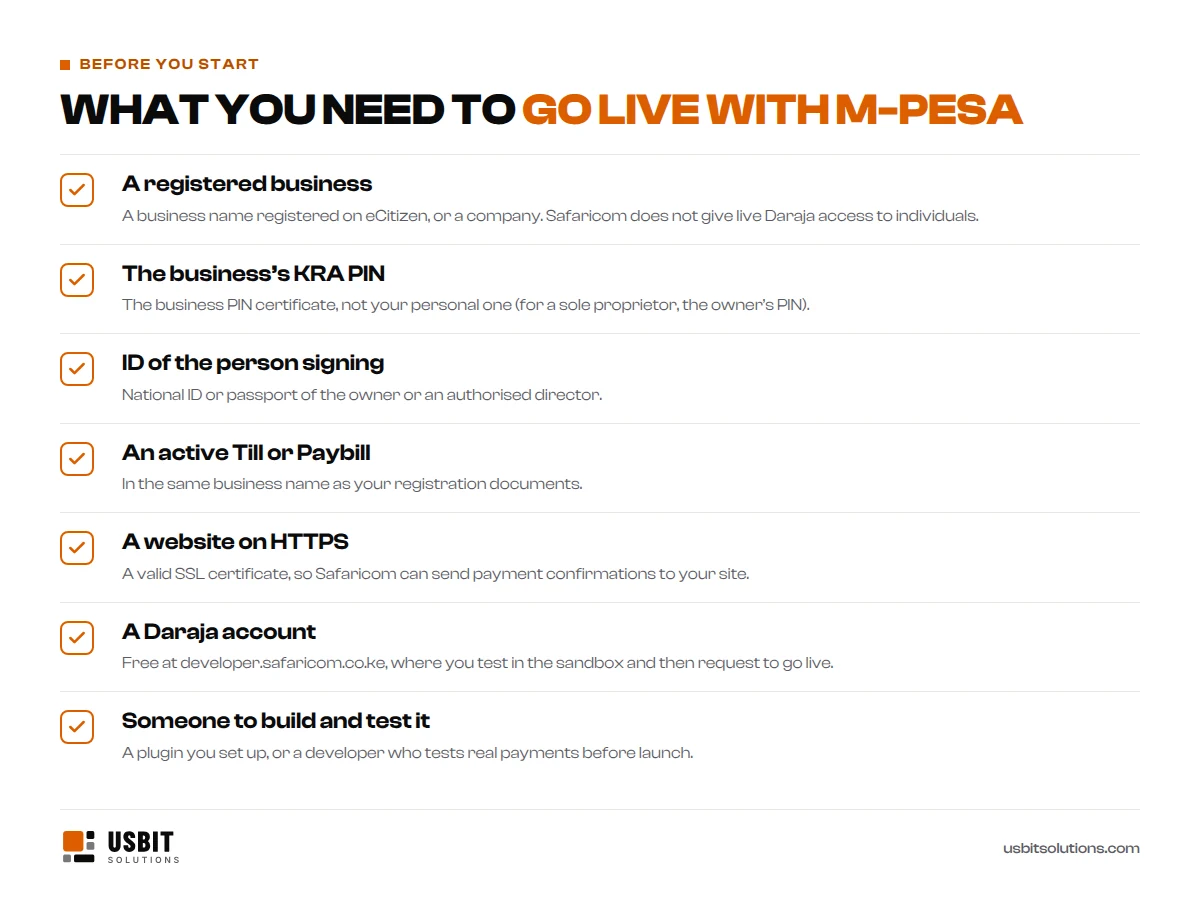
- A registered business: a business name registered on eCitizen, or a limited company.
- The business KRA PIN: for a sole proprietorship, this is the owner’s PIN.
- ID of the person signing: the owner or an authorised director.
- An active Till or Paybill in the same business name as your registration.
- A website on HTTPS with a valid SSL certificate, so Safaricom can send confirmations to it securely.
- A Daraja account, which is free.
- Someone to build and test it: a plugin you are comfortable setting up, or a developer.
Otieno’s till was registered under his old business name, from before he renamed the shop. He fixed that first, which saved him a rejected application later.
How to add M-Pesa to your website, step by step
Step 1: Get your Till or Paybill
If you do not have one yet, apply on the M-Pesa for Business portal with your registration documents. Make sure the name matches your business registration exactly.
Step 2: Create a Daraja account and a test app
Sign up at developer.safaricom.co.ke and create an app. You get test keys for the sandbox, Safaricom’s practice environment, where no real money moves.
Step 3: Connect your website in the sandbox
On WordPress with WooCommerce, this usually means installing an M-Pesa payment plugin and pasting in your keys. On a custom website, a developer builds the STK Push request and a callback: the address on your site where Safaricom sends payment confirmations. Test every case: a successful payment, a cancelled prompt, a wrong PIN and a customer who simply ignores the prompt.
Step 4: Apply to go live
In the Daraja portal, choose Go Live, upload your business documents and link your Till or Paybill. Safaricom reviews applications by hand. Allow about two to five working days, and longer in busy periods or if a document does not match.
Step 5: Switch to live keys and test with real money
Replace the test keys with your live ones, then make a small real payment from your own phone. Check that the order is marked paid, that the receipt code is saved and that you get the money. Only then switch it on for customers.

How much does it cost to add M-Pesa to a website?
There are two kinds of cost: setting it up once, and the small fee on each payment.
| Cost | What to expect |
|---|---|
| Daraja account and API | Free |
| Setting it up | Developer time, or your own time with a plugin. Often included in an online shop package. |
| Till (Buy Goods) payments | Free for the customer. For the business: free up to KSh 500, then 0.55% of the payment, capped at KSh 200 (Safaricom’s rates from 7 August 2026) |
| Paybill payments | A small fee per payment, paid by the customer or the business depending on the Paybill’s tariff |
| Payment gateway (if you use one) | The provider’s fee, often about 1.5–3.5% depending on the provider and method |
Safaricom cut its merchant charges in August 2026, doubling the free Buy Goods threshold from KSh 200 to KSh 500, as reported by The Standard. Tariffs do change, so confirm the current rates with Safaricom before you budget.
When M-Pesa payments go wrong (and how to fix them)
- The customer never gets the prompt. Check the phone number format (most systems want 2547…), that the phone is on and has signal, and that the SIM’s M-Pesa menu is up to date.
- The customer paid, but the order still says “pending”. The confirmation did not reach your website, usually because the callback address is wrong or the SSL certificate has a problem. A good integration also checks the payment status with Safaricom, so these orders fix themselves.
- The prompt timed out. The prompt only stays open for a short time. Let the customer try again with one tap, rather than starting checkout from scratch.
- Your go-live application was rejected. Most often the business name on the application, the documents and the Till or Paybill do not match exactly.
- A “payment” arrives as a screenshot. Never ship on a screenshot or a forwarded SMS. Only trust the confirmation your website receives from Safaricom, or your own M-Pesa statement.
Otieno’s new routine
Three weeks later, Otieno’s website had a green Pay with M-Pesa button. A customer in Kisumu ordered a pair of runners at 1:20 am. The prompt popped up, she entered her PIN, the order turned to “Paid” and the receipt landed in both of their inboxes. Otieno saw it at breakfast and simply packed the box.
No screenshots. No late-night checking. And no more fake “Nimetuma” messages, because the website only believes Safaricom.
Otieno is a composite of the shop owners we work with. The steps, requirements and rates in this guide are real.
Want M-Pesa on your website without the hassle?
Our E-commerce website package includes M-Pesa and card payments as standard, from KSh 120,000 once-off or KSh 12,999 a month plus KSh 16,999 setup. We test real payments before launch and make sure every order is marked paid automatically. Already have a website? Tell us what it runs on and we will quote for adding M-Pesa. You can compare every package on our pricing page.
Planning a new online shop? Read how much a website costs in Kenya first.
M-Pesa website integration FAQs
Can I add M-Pesa to my website without a registered business?
You can show your number and confirm payments manually, but Safaricom only gives live Daraja (STK Push) access to registered businesses. A business name registered on eCitizen is enough; you do not need a limited company.
Can I use my personal M-Pesa number on my website?
Not for automatic payments. A personal number or Pochi la Biashara is fine for receiving money manually, but STK Push needs a Till or Paybill.
How long does M-Pesa integration take?
With a payment gateway, often a few days. A direct Daraja connection usually takes one to three weeks, including Safaricom’s go-live review of about two to five working days.
How much does M-Pesa integration cost?
The Daraja API is free. You pay for the setup work, then Safaricom’s normal charge on each payment, or the provider’s fee if you use a payment gateway.
Does M-Pesa work with WooCommerce and Shopify?
Yes. WooCommerce has several M-Pesa payment plugins, and Shopify stores in Kenya use third-party payment gateways that support M-Pesa.
Is STK Push safe for my customers?
Yes. Customers enter their PIN in Safaricom’s own prompt on their phone, never on your website, and they see the amount and business name before paying.
Do customers pay a fee when they pay my Till?
No. Buy Goods payments are free for the customer. The business pays Safaricom’s merchant charge on payments above KSh 500.
Can my website take card payments too?
Yes, through a card payment gateway. Many Kenyan online shops offer both, because some customers, especially from abroad, prefer cards.